Wheel alignment

Tuesday 30 May 2023

And now for something completely different....

It's funny how statements which you make come back with a vengeance and bite you again!  The last photo on my May 9th post showed a banner which was a tongue in cheek version of John F Kennedy's speech about going to the moon.  The banner read "We do this not because it was easy, but because we thought it would be easy".  This certainly applied to a recent activity!

Our 11 year old granddaughter Georgia started intermediate school this year.  She's a smart cookie and is in an accelerated class where the work is set up to challenge them.  Each student was recently asked to come up with a project, implement it and report the results.  Georgia had seen something on power generation using a waterwheel and thought it would be cool to see how power output changed with water flow and gearing.  All this because they have a small stream passing through their property!  She asked her dad Kerryn (our youngest son) what he knew about the subject and the answer was very little. As the lead time for completing the project was only a couple of weeks or thereabouts, he was straight on to me to see what I knew about the topic. The answer was Sweet Fanny Adams, apart from understanding the physics and engineering principles.  The short time deadline was going to be quite a challenge.

A brief discussion was had over the phone with Kerryn, with the thought that the 3 generations could work together as well as Georgia conducting the experiments and writing the report.  Wherever possible, everyday recycled materials could be used.  How hard could it be? And then the catch.... would Nana and Granddad mind doing the 400 km round trip this coming weekend to help make it all happen?  Immediate thoughts went back to the first paragraph of this post - no pressure then!

The best part of day one after the phone call was spent on YouTube and other sources learning about different types of waterwheel and it became quickly apparent that an undershot wheel was the only practical option because their stream was relatively shallow.  Next step was to see what resources we already had which might be useful for constructing a waterwheel.

Jennie had an old bicycle which had been unloved and not ridden for 3 or 4 decades.  That might be a useful source of big sprockets and maybe a chain.  I had an alloy bike rim which we inherited with the house decades ago and a quick bit of dismantling got underway.  I also dug out some threaded bar, stainless tube and other bits and pieces which Jennie previously referred to as hoarded junk, sigh...  I also requisitioned one of Jennie's nylon chopping boards to make thrust washers for new axles. It wasn't strictly theft as it had been re-purposed some time ago as a fishing bait board for the boat!

Collecting possible components with only a vague design plan at this stage

Next step was to head to the village transfer station and see if there were any old bikes with sprockets of various sizes.  One was spotted under sheets of corrugated iron in a pool of disgusting water.  Quite a job pulling it out in those unsanitary conditions.  Good value for a couple of bucks!  A quick bit of hacksaw work to get the sprocket and chain off, followed by soaking the chain in kerosene to loosen up the rust.

Raiding the village dump for more sprockets and chain

A call with Kerryn revealed that he had some plastic downpipe which could be made into vanes for the undershot waterwheel.  He built a shopping list of bolts and other fittings, plus our one and only purchase of a new piece of equipment.  We had intended to use a car generator from a wreckers yard but found a brand new mini-generator online at much the same price we would have paid for a car component.

Mini 12/24v DC generator

Armed with tools, boxes of bits and fingers crossed, we set off on the 200 km trip. I got stuck in and made a large sprocket carrier to the bike rim which was going to carry the vanes whilst everyone else departed for Georgia's Friday night hockey match.  Next morning, another family departure for our grandson's rugby match whilst Georgia and I measured and cut up the piping for the vanes.  She'd never used a jigsaw before so we had a short practice and then onto the real thing.  She was outstanding and made beautifully straight cuts.

Georgia splitting the piping with a jigsaw

After splitting the pipe, she then marked the halves up for cutting into individual vanes.  The width was a pure judgement call on our part, having seen the professional wheels on YouTube for serious domestic power generation. Let's call it an educated guess.....

Using a jig for marking out the individual vanes

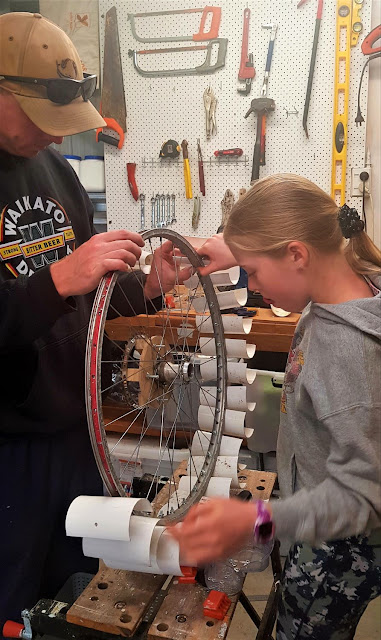
With weekend school sport taken care of, I made up the axle assembly whilst Georgia and her dad mounted the waterwheel sprocket then drilled the wheel rim and vanes and bolted them up.  Another judgement call about how many to use, just using years of accumulated engineering experience and the obligatory crossing of fingers.

Bolting the sprocket to the carrier

Fitting the vanes

The completed wheel

With the axle in place and the wheel spinning freely, a support frame was made from timber by Georgia and her dad, with adjustable legs from threaded bar, then carrying it to the stream to see if it actually worked - the real acid test!  A brilliant outcome with 60 rpm being attained in a faster part of the stream.   I should mention that the stream is at the bottom of a steep gully so getting all the kit there and back wasn't a straightforward exercise by any means!

Happiness is a spinning wheel

Sunday dawned with the main goal of hooking up the generator.  It was spun up at various rpm using an electric drill to obtain voltage output characteristics, particularly at speeds that the waterwheel would rotate at. A good confidence boost as it worked just fine.  A mount for the generator was made, using clamps for chain alignment and tensioning.  With time being a precious commodity, a rudimentary coupling was made to mount the generator sprocket. Not a perfect solution but adequate for the experiments to be run.

Setting it all up

With time getting on, Jennie and I had to make the 3 hour trip home whilst Georgia and her parents headed for the stream again to test how the completed rig worked.  Very much in our thoughts on the way home and a hope that I hadn't lost any engineering mojo with that dodgy coupling!

Got a message soon after we arrived home, complete with videos and photos - an outstanding success in every respect, apart from the chain periodically jumping off the sprockets.

Measuring the output voltage with different sprockets

Documenting the results

Georgia hooked up with fairly lights!

An immensely satisfying weekend for multiple reasons.  The pleasure and fun of the family working brilliantly together across 3 generations, pride in seeing how hard Georgia worked and her focus, overcoming problems on the run with very tight timelines plus all of us learning new stuff.  None of us are ever too old to learn new things, it's what keeps us alive.  It really doesn't get any better than that!  The future is in good hands with young folk like Georgia around.

Postscript

Georgia has to complete her report and submit it this week.  Her parents and grandparents might be a teensy bit biased but when it's finally assessed, it's hard to imagine that the outcome will be a poor one!

Addendum late June: Georgia has just given her oral presentation at school and was given an "exceeded expectations" result.  The project also won a silver rosette at the regional science fair.  So darned proud of that young lady!

Proud Dad and daughter


Saturday 13 May 2023

Flushed with success

I apologise in advance for the title which is an appalling pun, but please bear with me as I'm in engineering heaven!  Sonja, your husband will fully understand!

MGB 60th anniversary meeting, Auckland 2022

Since purchasing the MGB GT just short of 2 years ago, the emphasis has been on setting up a planned maintenance schedule.  The previous owner was meticulous in keeping records of the restoration in 2017/18, but there was no record of subsequent maintenance.  To a professional engineer this was sacrilege (cue eye-rolling and sighing from Jennie).  Besides, record-keeping for a classic car is an essential part of sales strategy should we ever wish to sell it.  An Excel spreadsheet was duly set up to track expenditure and maintenance activity. (More eye-rolling and sighing).

Everything is pretty much up to date now with just a couple of small(ish) jobs scheduled before Spring with another having been ticked off the list this week.  Let me introduce you to the murky world of the cooling system.  Most modern car and bike owners don't give the cooling system a second thought, apart from occasionally looking at the level in the radiator or overflow bottle.  With classic cars, the cooling system requires rather more attention.  In our climate, antifreeze properties of coolant aren't an issue but a good glycol-based coolant raises the boiling point which can be helpful in adverse conditions. Of most interest to protect our investment is the anti-corrosion property, particularly with a cast iron engine.

Early on in the ownership, I drained the existing coolant which was rust-coloured and with a small amount of sludge in the radiator.  No flushing or anything at that stage, just refilled it with some Prestone premix which was on special locally.  I figured that it would give better protection whilst some of the other priorities were attended to.  Fast forward to the current time. I was ready to do a thorough job and saw an article on a Castrol coolant called 4Life.  The interesting bit in the article was that it offered superior corrosion protection than cheaper alternatives over a longer period.  Another interesting feature is that it detects head gasket leaks by changing colour!  Product duly purchased, along with a flushing agent to do a proper job.

Castrol 4Life long lasting coolant, plus coolant flush

Take the car for a short drive to warm the old coolant up, then drain it.  Still a bright fluorescent green, it was in good order with relatively little rust contamination, just a bit cloudy.

Old coolant.  Still in good order, at least visually

Next step was to refill the system with filtered rainwater, adding Penrite radiator flush and then heading out for a 20 minute drive to circulate it.

Adding radiator flush - good for up to 15 litres of coolant

The radiator flush clearly did its intended job on the cooling system with quite a bit of discolouration in the drained coolant.  The surprise was that it was still quite green, indicating that there was quite a bit of old fluid lurking in the nooks and crannies of the engine, radiator, heater and pipework.  Shining a torch inside the radiator filler cap showed a nice clean radiator core - result!  Two more repeats until the water ran clear, taking temperature readings with a heat gun to make sure that nothing untoward was happening. I call it an essential tool.  Jennie calls it "just another toy", sigh.....  Cool to see the red laser aiming dots shown in the photo though.

All good, temperature-wise

With the flushing water in the cooling system now running clear, it was time to fill up with the premixed 4Life coolant which looks like translucent cherryade.  A straightforward job, take it out for a run, check for leaks and job done.  The engine has never run hot and the new coolant seems pretty much the same as the old one in that respect. However, by thoroughly cleaning the system this time before adding new coolant, it's something which should now be fine for many years.  Half a day well spent.

Adding the new coolant

Just to prove that I'm not a complete automotive tragic, another little project is underway.  A few years ago, we had stained glass windows made for our upstairs lounge by a neighbour who was a real renaissance man when it came to anything arty.  The high level windows depicted scenes based on where we live - the Coromandel Peninsula.

Stained glass windows - upstairs lounge

We also have a tapered high level window in one of our bedrooms which is a pain to clean and near-impossible to curtain.  A stained glass insert would be a perfect decorative solution.  Based on a photo I took in the garden of a Tui nectar-eating bird on one of our plants, a preliminary computer sketch was generated to see how it would translate.  Pretty good as it happens.

The original photo of a Tui in the garden

Mock-up of stained glass window based on the photo (about 0.75 metre square)

The Tui will be in iridescent blues and green on the real thing.  Sadly, our neighbour has since passed but we found another craftsman on the Peninsula who will make it for us.  Inevitably, his skills are in great demand so we have to join the queue for his services.

Plenty of variety to keep me occupied in retirement!